DIY Beeswrap
Say goodbye to plastic wrap and hello to sunshine-filled sustainability! Whether you’re packing snacks for a picnic, wrapping up leftover watermelon, or just want a more eco-friendly kitchen, DIY beeswax wraps are the perfect summer project.
Why You’ll Love Them 💛
Beeswax wraps are breathable, reusable, and totally plastic-free — perfect for keeping your food fresh while reducing waste. Plus, they’re super cute and customizable with fun, summery fabric patterns like lemons, florals, or bees! 🐝🌍

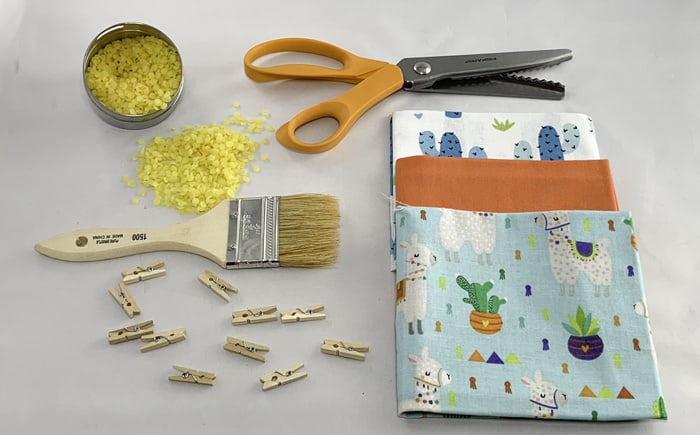
🛠️ What You’ll Need:
-
100% cotton fabric (lightweight + colorful is best!)
-
Grated Champlain Valley Apiaries beeswax
-
(Optional) Pine resin + jojoba oil (for extra stick + flexibility)
-
Parchment paper
-
Baking sheet
-
Paintbrush (just for wax)
-
Scissors or pinking shears
-
Oven preheated to 200°F (95°C)
🍋 Let’s Make It!
-
Cut your fabric into squares (8"x8" for snacks, 10"x10" for sandwiches, 13"x13" for larger items). Use pinking shears for a cute, no-fray edge.
-
Place fabric on parchment-lined tray and sprinkle with beeswax evenly.
-
(Optional) Brush on melted pine resin + jojoba oil mix for added stickiness.
-
Bake for 5–8 minutes until the wax melts and soaks in.
-
Brush out the wax while warm for even coverage.
-
Lift and wave until the fabric cools and stiffens — it takes just a few seconds!
-
Hang to dry and voilà — summer wraps ready to go!

🌻 Use & Care Tips
Use the warmth of your hands to mold wraps around bowls, fruit, or sandwiches. Avoid heat (no microwaves or hot water!), and just rinse with cool water + mild soap when needed. With love and care, they’ll last you through the whole season — and beyond!
DIY beeswax wraps are a breezy summer craft that’s as practical as it is pretty. So grab your favorite fabric, cue the sunshine, and give your kitchen a sweet eco-upgrade this season! 🌞


